Navigation Bar Home Furniture Posts DIY POSTS Photography Design
Showing posts with label DIY. Show all posts

6.29.2011

A Prototype Scarf

A couple weeks ago Sarah and I decided to try to revive our middle school sewing skills. It was a scary prospect but we borrowed a friends sewing machine and dove in head first.

Disclaimer: Fashion majors and people who actually know how to sew, look away. We have no idea what we're doing :)


We decided the easiest thing to try was a scarf. So we got started...

and 45 minutes later we had the machine threaded!

Seriously.

Sarah had a bunch of fabric remnants so we picked a few colors we liked, laid them out and cut them to approximately the same width.

This is me after sewing the first time since middle school!


We sewed all three pieces together to practice our straight lines ahah.


Then we pinned it and essentially turned it into a giant tube. We wanted it to be big and voluminous so it was pretty large.


Then we sewed it together so it was a giant circle. Here's Sarah rockin' the finished product.


We've got many more ideas! And with more practice we're starting to get the hang of the whole sewing thing. Maybe next time we'll actually look up some instructions or something :)

Sincerely,
Ashleigh

6.26.2011

Call me crazy...again.

I feel like the majority of my posts should start out this way. I posted my first crazy idea here and I'm still working on that one. Meanwhile, I saw on a blog (and I can't remember where!) that someone used contact paper to make chevron stripes on their wall. I thought this was a genius idea because I'm a renter and can't do anything permanent.

Well, if you know me at all, I'm not one to measure and take my time so chevron was not going to work for me. Stripes seemed simpler. I thought I had a one of a kind idea but as soon as I googled "tape on walls" I ran across this post over at High-Heeled Foot in the Door. So I'm not a genius haha but it was nice to find someone who had already done this!

I used three inch electrical tape that I ordered off Amazon. I'm kinda lazy so I skipped the measuring and math and just tried to space my stripes 5 inches apart. They aren't perfect but I'm ok with that. I'm pretty short so reaching the ceiling was a small victory in itself!


I picked up these vintage jello molds from Cindy over at Custom Comforts. I love the way they look with the gold mirror.


So, what do you think? I don't even know if I love it. I'm trying to picture a gallery wall behind the tv eventually. But I'm still not sold. The best part? I can take it down if I don't like it. I promised myself I'd live with it a few days before I take it down.

It is starting to grow on me :)

Sincerely,
Ashleigh

PS: "Like" us on Facebook (on our sidebar) to get sneak peeks of projects like this :)

PPS:
Transformation Thursday

6.15.2011

Call Me Crazy....

I think I'm going to turn my twin bed into a couch. This would definitely be my biggest repurposing project to date. But I don't think it would be very hard at all.


Here's why:
I wouldn't have to drop $500 bucks.
I'd be using something I already have. Love being green.
It's cheap.
I would have to live 2 weeks sans couch while waiting for the one I want to arrive.
It would be a perfect spot for overnight guests.
Did I mention I wouldn't have to spend $$$$?

I stumbled across this while looking for an interim solution to use until my couch arrived:

Source

 I would only have one, but I think it could work! I think I'll use a 10oz dropcloth to make the cover. I thought about a king sized flat sheet but I think a drop cloth will look a little crisper. It doesn't have to be perfect. I like how this one is casual looking. If I end up hating it... well I can save up for a couch and get it later.

This will be happening pretty soon. So I will keep you all posted on the progress.

Ok, be honest. Have I really lost it this time?

Sincerely,
Ashleigh

6.13.2011

DIY Project List: 2

Today I'm bringing you round 2 of totally cheap and totally do-able DIY projects. 

If you missed the first edition, you can find it here.


Industrial Chic Shelving

Ana White has done it again. Exposed metal? Check. Raw wood? Check. Cheap and easy? Check and check. These shelves are gorgeous, casual and a great way to display pretty much anything.

Click here for full instructions.
Approximate cost: $20


Perfect Cut Off Shorts


With summer approaching this tutorial is well timed. It comes from the lovely girls over at Red, Blonde and Burlap. I know I can't be the only one who has ruined a pair of pants by chopping away with them at scissors. Follow this easy tutorial and you'll never butcher a pair of jeans again... or worse-- have one leg longer than the other.

Click here for full tutorial.
Approximate cost: Free!


5 Minute Pillow Cover

Throw pillows are great, not just for looks, but for sisters who come to visit you that sleep on your couch and you don't want to give them your pillow... Just kidding! I have lots of regular pillows too haha. I digress. This is a simple tutorial to make covers for your pillows. I don't sew and I think even I could do this. It's an easy way to use fun fabrics or even upcycle. Use goodwill fabrics or an old sweater to drive the cost of this already cheap project even lower.

Click here for full tutorial.
Approximate Cost: $10
(Free if you reuse things you already have.)


So there you have it! Is there anything special you'd like to see? Or do you have projects that would make great additions to my DIY lists? Email sincerelyco @ gmail . com with your ideas and suggestions!

Sincerely,
Ashleigh

PS: For more DIY inspiration you can follow me on Pinterest!

6.10.2011

My $3 Vanity Mirror

Hello!

Let's skip the small talk and get right to it! I bought this little vanity mirror and a junk shop for 3 big ones. I know, I know. So expensive ; ) I forgot to take a picture before I got started, but I remembered soon enough to be able to show you what the original finish looked like!

It was black with hints of gold and I really wasn't feeling it. It stayed that way for a little bit while I decided what to do with it. I contemplated a bright glossy color, but decided I wanted to give gold a shot. I looked in to gold leafing but decided that was more money and time than I wanted to invest.

I picked up a tube of rub 'n buff for a few bucks and went to town.


In progress.


This ^^^ was the finish before. Too dark/gothic looking for me. Here it is after the rub 'n buff:


It stayed like this for a while too. I liked it, but I never really used it. I usually stand up at my vanity to do my hair and make up so I never even looked into this mirror.


I still liked the way it looked so I decided, while doing this project, to give it a little chalkboard love.

I considered writing some confidence-boosting-esteem-building-tyra-banks-ish quote on it. 

Like so:


But then I decided to keep it real and write something a little more useful: 


Am I the only one who doesn't notice an annoying stray eyebrow hair until I get into the driver's seat and look in the rear view mirror? No?


This is crazy! I saw my mirror in a boutique in the Short North this past weekend. Theirs was painted a creamy white... and I kind of like it!


I think, for now, mine will stay the same.

Sincerely,
Ashleigh

PS:

5.29.2011

A DIY Industrial Lamp... For Free!

I'm super excited about this project! It was a pretty spur of the moment thing, but I'm so glad I decided to give it  shot.

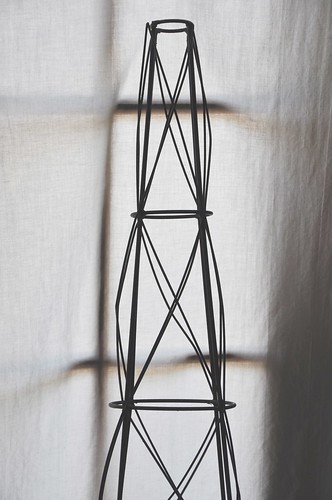
It all starts with this rusty tomato cage from our yard. My mom isn't keeping a big garden this year and when I saw this in the yard I asked if I could have it. I wasn't sure what I'd do with it, but I liked it and thought I could make something out of it.

I've been looking around for a lamp for my new place and haven't found anything I love. It doesn't help that even the cheapest lamps are $40! So I figured I could somehow turn this into an industrial-esque lamp.

DSC_4852 

I remembered I had been hoarding an old brass lamp so I brought that up from the basement. At first I thought it would be really easy to take the socket and cord out and re-use it. Then as I started taking the lamp apart I thought it was going to be really hard...then I did a little research and found out it really wasn't very hard at all!


I only needed the socket and cord for my lamp, but I ended up using that long metal tube as well.

First, I pulled apart the socket by squeezing really hard where it said "press".

Next you'll see that the cord is split, stripped and wrapped around two screws. Carefully loosen the screws and remove the wires. Now you'll be able to pull the cord out of the lamp.


I did not like the shiny brassy color of the socket and thought about spray painting it black but didn't know if that was a good idea. So I tried rubbing it off with nail polish remover. A few cotton balls later and I was left with this:


After running the cord back through the metal tube thing (I know there's a real name for it but I don't remember  it at the moment) I was ready to reattach the socket.

Feel your cord. One side will be smooth and the other will be ribbed. The smooth wire is the hot or live wire and the ribbed is the neutral wire. The live wire (smooth) wraps around the brass screw. Remember this and you'll be fine. When I had both wires connected and the socket reassembled I crossed my fingers and plugged it in...

and it worked!


Now, we'll talk about the tomato cage. It was already cool and chippy and rusty, but it had been purple at one point and I wasn't feeling that. So I used a trio of spray paint to give it a little facelift. All of these my mom already had so I didn't have to pay anything :)

I used a textured stone paint, a rusty metal primer (that is rust colored) and a flat black.


I didn't take pictures of this process, but I'll describe it. If anyone would like a more indepth tutorial I'd be happy to do one :)

First, lightly spray the stone spray paint all over, concentrating on the joints where rust is most likely to be. Then alternate spraying the primer and the black. You get to use your creative license because you don't want to solidly coat it with either color. 

I started with the primer, then hit spots with the black, went over some more spots with the primer and so on and so forth until I liked the finish.


Not too shabby, eh?


You could use this technique on so many things. I'm sure I'll be using it in the future.

I strung up the bulb and plugged it in...


I love it! I thought about shortening it, but I kind of like the dramatic impact it makes.


I'm swooning over the silver socket. To think that was hiding under that terrible brassy finish!


So, what do you think? Be honest! Love it? Hate it?

I was thinking about wrapping the cord in twine. What do you think? It's brown right now so it blends in. But twine would add some texture. I don't know! Opinions please!

Oh also...

Estimated cost: $0

How cool is that?!

Thanks for reading. Feel free to ask questions!

Sincerely,
Ashleigh

PS:
The DIY Show Off  Beyond The Picket Fence

My Uncommon Slice of Suburbia Photobucket
Transformation Thursday
The Lettered CottageDomestically SpeakingHOGChic on a Shoestring Decorating
Funky Junk's Saturday Nite Special

Related Posts Plugin for WordPress, Blogger...