Navigation Bar Home Furniture Posts DIY POSTS Photography Design
Showing posts with label free. Show all posts

6.06.2011

My First Curbside Makeover

Hi all. I'm excited to bring you my first ever curbside makeover. Well, there was that coffee table. But that wasn't mine. I first showed you this end table in this post. Here's a little refresher:


It is a pretty solid piece. The drawer is dove tailed an the only thing majorly wrong with it (besides the dated yellow finish) was the peeling veneer on the top.


I peeled off the remaining veneer using the hot iron and towel method. I used wood filler to fill the bigger gouges. Then I used spackle to go over the entire area to even it out. I let that dry, sanded it, did another layer and then sanded it again. I used fine grit  to ensure a smooth surface. I also used this time to fill in a few other minor scrapes. I usually don't do this, but I didn't want to distress this piece so it was necessary.


Inspired by Cassie's nightstands (over at Primitive & Proper) to break outside of my color comfort zone, I picked out a deep purple. I wasn't quite ready to go too bright haha.


The color is Kalamata Olive by Behr.


The knob is from Anthro on sale. Yellow and purple are compliments so it made sense. I think it's fun. I could always change it to something more subdued if the mood strikes me. 


I think this one will be coming with me to the new apartment...

 
...which I move into in like a week and a half. Crazy! So if we're a little light on posts it's because we're in a transitional period! But don't worry, we'll have lots to blog about once we're settled in!

How do you feel about the purple? Love it or hate it?

Sincerely,
Ashleigh

PS:
  http://linda-coastalcharm.blogspot.com/HOGPhotobucketMy Uncommon Slice of Suburbia Domestically SpeakingPhotobucketTransformation ThursdayFurniture Feature FridaysChic on a Shoestring Decorating

6.02.2011

A Curbside Coffee Table

Who doesn't love free stuff? It must have been fate. Around the time that I picked up my first curbside find my best friend, Rachel, called to tell me she found an awesome coffee table someone was throwing away in her neighborhood.

{I apologize for all the yucky iPhone pictures in this post.}
Here it is after we applied some paint stripper to the top. it looks white, but it's actually a gross looking light yellow. I can't even describe it.

I have nothing against yellow, as you can see in this coffee table makeover I completed a while back. But this was. just. wrong.


The paint job was sloppy and thick and required a lot of muscle to strip.

After the first round of stripping.

After the second round of stripping and sanding forever.


We stained the top dark walnut and painted the base in a white we had left over from this project.


The knobs were on the piece when Rachel found it and we liked them so they stayed. Rachel, unfortunately, does not have room for this in her apartment, so right now her parents are fostering it in their living room. When Rachel does have room for it... it may get ugly!


We did a little distressing to bring out some imperfections and blend nicely with the worn top.


It's a beauty all right. And the only thing Rae had to buy was some stain. This project literally cost only pennies. I'm a little jealous.

Anyone else find any fab "trash" lately?

Sincerely,
Ashleigh


PS: Don't forget to download our free June calendar!

PPS: 

6.01.2011

Happy June!

Screen shot 2011-06-01 at 9.49.50 PM


                 Here's a sneak peek of this month's calendar! Click here to
                 download/print off and enjoy your June calendar! 
                 (Designed especially for you from Sarah.)

5.29.2011

A DIY Industrial Lamp... For Free!

I'm super excited about this project! It was a pretty spur of the moment thing, but I'm so glad I decided to give it  shot.

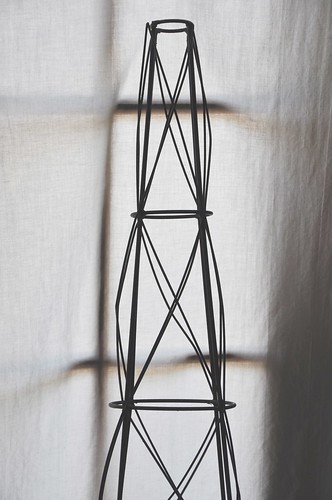
It all starts with this rusty tomato cage from our yard. My mom isn't keeping a big garden this year and when I saw this in the yard I asked if I could have it. I wasn't sure what I'd do with it, but I liked it and thought I could make something out of it.

I've been looking around for a lamp for my new place and haven't found anything I love. It doesn't help that even the cheapest lamps are $40! So I figured I could somehow turn this into an industrial-esque lamp.

DSC_4852 

I remembered I had been hoarding an old brass lamp so I brought that up from the basement. At first I thought it would be really easy to take the socket and cord out and re-use it. Then as I started taking the lamp apart I thought it was going to be really hard...then I did a little research and found out it really wasn't very hard at all!


I only needed the socket and cord for my lamp, but I ended up using that long metal tube as well.

First, I pulled apart the socket by squeezing really hard where it said "press".

Next you'll see that the cord is split, stripped and wrapped around two screws. Carefully loosen the screws and remove the wires. Now you'll be able to pull the cord out of the lamp.


I did not like the shiny brassy color of the socket and thought about spray painting it black but didn't know if that was a good idea. So I tried rubbing it off with nail polish remover. A few cotton balls later and I was left with this:


After running the cord back through the metal tube thing (I know there's a real name for it but I don't remember  it at the moment) I was ready to reattach the socket.

Feel your cord. One side will be smooth and the other will be ribbed. The smooth wire is the hot or live wire and the ribbed is the neutral wire. The live wire (smooth) wraps around the brass screw. Remember this and you'll be fine. When I had both wires connected and the socket reassembled I crossed my fingers and plugged it in...

and it worked!


Now, we'll talk about the tomato cage. It was already cool and chippy and rusty, but it had been purple at one point and I wasn't feeling that. So I used a trio of spray paint to give it a little facelift. All of these my mom already had so I didn't have to pay anything :)

I used a textured stone paint, a rusty metal primer (that is rust colored) and a flat black.


I didn't take pictures of this process, but I'll describe it. If anyone would like a more indepth tutorial I'd be happy to do one :)

First, lightly spray the stone spray paint all over, concentrating on the joints where rust is most likely to be. Then alternate spraying the primer and the black. You get to use your creative license because you don't want to solidly coat it with either color. 

I started with the primer, then hit spots with the black, went over some more spots with the primer and so on and so forth until I liked the finish.


Not too shabby, eh?


You could use this technique on so many things. I'm sure I'll be using it in the future.

I strung up the bulb and plugged it in...


I love it! I thought about shortening it, but I kind of like the dramatic impact it makes.


I'm swooning over the silver socket. To think that was hiding under that terrible brassy finish!


So, what do you think? Be honest! Love it? Hate it?

I was thinking about wrapping the cord in twine. What do you think? It's brown right now so it blends in. But twine would add some texture. I don't know! Opinions please!

Oh also...

Estimated cost: $0

How cool is that?!

Thanks for reading. Feel free to ask questions!

Sincerely,
Ashleigh

PS:
The DIY Show Off  Beyond The Picket Fence

My Uncommon Slice of Suburbia Photobucket
Transformation Thursday
The Lettered CottageDomestically SpeakingHOGChic on a Shoestring Decorating
Funky Junk's Saturday Nite Special

Related Posts Plugin for WordPress, Blogger...